PDGA Tournament Manager Help: Tournament Configuration
- Set Number of Rounds
- Upload Player Data - Basic
- Upload Player Data - Advanced
- How To Display Waitlisted Players
- Review / Edit Registered Competitors
- Formatting for Doubles/Team Events
- Set Up Courses and Layouts
- Groups (Tee Times / Hole Assignments)
Set Number of Rounds
The "Number of rounds" field should be set to the total number of regular rounds in which all competitors will compete in. The number entered should not include any semi-final or final rounds.
Semi-Finals & Finals
The Semi-finals and Finals checkboxes should only be used in the event of a reduction of the field size for any particular division, AKA when a "cut" is made.
- If only one reduction of field size takes place, only the Finals checkbox should be checked.
- If the field size is reduced once and then reduced a second time, both the Semi-Finals and Finals checkboxes should be checked.
Upload Player Data - Basic
- If you haven't already done so, please download the latest version of the TD Report in Excel format. It's a good idea to rename the file to include the event name and year to make it easier to find later.
- Open the "Scores" tab at the bottom of the TD Report spreadsheet. Enter in the players' divisions, first names, last names, and PDGA numbers (if applicable) in the appropriate columns.
- Highlight the player info on the spreadsheet along with the headings and copy (CTRL+C or Command+C).
- Go back to Tournament Manager and click on "Upload" in the main menu.
- Paste (CTRL+V or Command+V) the player information you copied from the spreadsheet into the "Data Input" text area.
- If your data has a headings row, leave the "First row in results contain field names" checked and leave the "Overwrite existing results" box unchecked.
- Click the "Next >>" button.
- The "Field Mappings" page asks you if the field names from the spreadsheet match the available database columns. Make sure they do and click "Next >>" again.
- Check the "New" box next to any players that are being added or match them to previously uploaded players on the "Player Matching" page.
- The "Summary Information" page provides you with an opportunity to double check your work before committing the upload to the database. If everything looks okay, click the "Next >>" button.
- The upload process has been completed and you should now see an "Upload Successful" message and the "Tournament Result Summary". For full results, click on the "more" links under the top three results from each division or the "Results" link in the navigation menu at the top of the page.
Upload Player Data - Advanced
There are several fields that can be added to any Upload that are not contained in the TD Report. If any of these fields need to be uploaded, it is best use the spreadsheet generated from the Tournament Manager "Export" function.
From any page in Tournament Manager, click on "Export" in the menu at the top of the page. A spreadsheet will be generated and saved to your computer. Use this spreadsheet for all future uploads when any of the fields below are being used. Follow steps 3-10 in the "Upload Player Data - Basic" section above to complete the upload.
- Tee Time: Manually set specific tee times for each player. *UPDATE: The "Groups" page has been added to make the tee times process much faster and simpler. See the Groups instructions below.
- To prevent errors during the upload, enter the tee times in 24-hour format. (e.g. Enter 14:15 instead of 2:15PM.)
- Start: The Start field is a free-form text field that can be used for any number of reasons, most notably for uploading course names or hole numbers that players will start on, or to indicate that a pre-registered player is on the waitlist for a specific division.
- TeamName: Assign a common name to players on the same team. This is often used for doubles events or collegiate events.
- If used for an upload, the TeamName field needs to be manually added to the Scores tab on the TD Report as its own unique column.
- Pool: If you think your event needs to use pools, head over to the PDGA Pools School for more info.
How To Display Waitlisted Players for Tournament Pre-Registration
When a TD is fortunate enough to have filled their event via pre-registration they may wish to run a waitlist. Displaying players online who are on the waitlist along with the players who are pre-registered can help reduce the number of phone calls or emails that the TD receives from players wanting to make sure they are on the waitlist, or asking if they have moved up on the list, etc.
Waitlists with The Disc Golf Scene
Our partners at DiscGolfScene.com have a great waitlist system in place for those that choose to use them for online registration that updates on the fly as new players register and/or drop out.
NOTE: If you are using The Disc Golf Scene as the registration service for your event, please direct any registrants with questions about the waitlist to the "Registered Players" tab on your event's page on The Disc Golf Scene.
Waitlists with the PDGA Tournament Manager
The easiest way to display the waitlist, while still maintaining a divisional sort, is to simply process a player data upload in Tournament Manager using the Start field to display waitlist information. The Start field is a free-form text field, meaning no matter how you choose to enter the waitlist data (Waitlist #1, Wait #1, W1, etc.) it will display correctly on your event page on PDGA.com.
- Open the spreadsheet created from the Export feature in Tournament Manager.
- Populate the Start column for only those players on your waitlist with appropriate text such as "Waitlist #1", "Waitlist #2", etc.
- Upload the waitlist data by following the instructions in the "Upload Player Data - Basic" section above.
As shown in the screenshot below, the online display on your PDGA.com event page will now indicate those players that are on the waitlist.
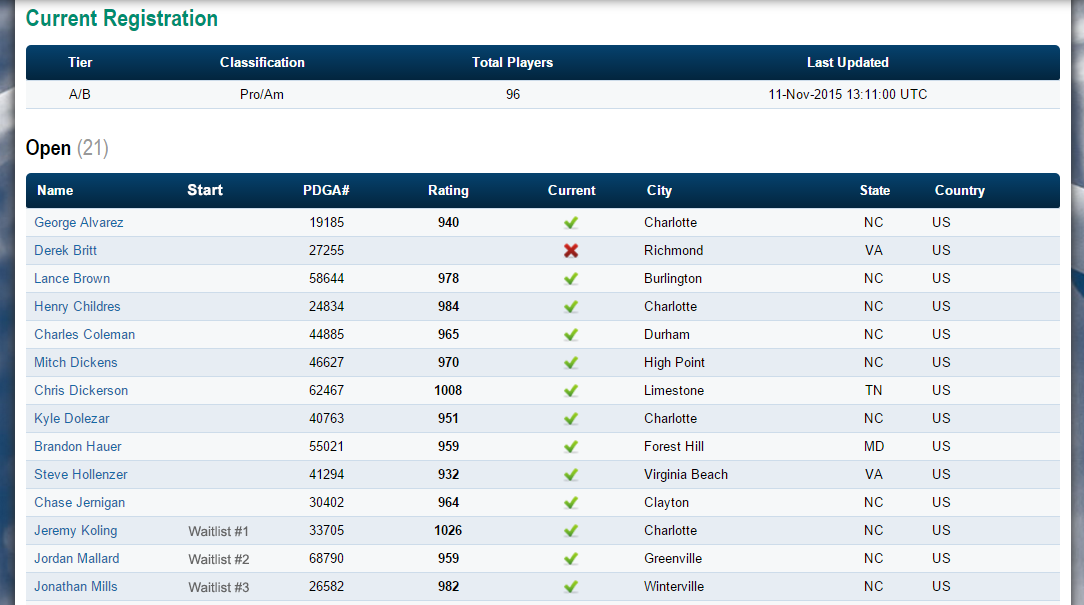
Note: This method will still keep your players sorted by their proper division, so if you need to run multiple waitlists you can. For example, if you have registration caps on Pro vs Amateur players you can run a Pro waitlist and an Am waitlist. Simply mark your Pro waitlist with “Pro Wait #1”, “Pro Wait #2”, etc. and your Am waitlist with “Am Wait #1”. “Am Wait #2”, etc. If your tournament has registration caps by division you can also list those as "MPO Wait #1", "FPO Wait #1", etc.
Important: As players come off your waitlist and enter the tournament, you will need to remove their “WaitList” entry in the Start column and re-upload. If you wish, you may also want to adjust the waitlist numbers as well (e.g. the person that was Waitlist #2 becomes Waitlist # 1). When making changes such as this, where players come on or off the waitlist, you should use the “Overwrite Existing Data” checkbox during the upload process and re-upload ALL PLAYERS in order to make sure that all players are displayed correctly.
When you no longer need to display the waitlist (and/or prior to doing your first scores upload), simply delete the “Start” column prior to the upload.
Review / Edit Registered Competitors
The Players page contains information about each of the registered competitors including name, PDGA #, Class, and Rating, Age and Gender verification checks are shown for divisions where they're applicable, and will either show a check mark or a red exclamation mark. Rules Official status is only shown if the tournament tier requires it (Elite Series and Majors). Personally identifiable information (Phone number and Email Address) is only shown if this information was collected from the player during the registration process on DiscGolfScene. The competitors are sorted first by division and then by name.
Quick Add / Remove Players
Registered competitors can be added or removed quickly and easily using the Players page.
- If the competitor is already registered and needs to be removed from the list, simply click the REMOVE button next to their name. The button label will change to Undo and can be clicked at any time so long as the Save Changes button has not been clicked.
- To add a competitor, click on the "+ Add a player" link above the respective division to which they need to be added. Fill in their first name, last name, PDGA # (if applicable) and click the ADD button.
- If you clicked the "+ Add a player" link for the wrong division, you can type in the correct division code in the box to the left of the ADD button or simply click the CANCEL button and scroll down to the correct division and add them from there.
Review Competitors for Potential Issues
The Players page also allows for a TD to quickly see any potential problems with any of the registered competitors.
- Items marked in red indicate an issue that needs your attention. PDGA# = membership not current or will expire prior to the event; Class = ineligible for division; Rating = over division maximum; Age = ineligible for division; Gender = ineligible for division; Official ✘ = not a certified official or certification will expire prior to the event).
- A player that is highlighted in red indicates that the player is currently suspended and ineligible to participate in PDGA sanctioned events.
Formatting and Uploading Data for Doubles/Team Events
If your event was registered as either a Doubles event or a Team event, an additional “Team Name” column will be used when uploading player data/scores. *Note: We strongly recommended that any doubles or team event sets up online registration via The Disc Golf Scene, as it automatically integrates and uploads team names to your event page on PDGA.com.
Initial Upload Without Online Registration
- If you haven't already done so, please download the latest version of the TD Report in Excel format. It's a good idea to rename the file to include the event name and year to make it easier to find later.
- Open the "Scores" tab at the bottom of the TD Report spreadsheet.
- Insert a new column to the left of the DivCode column and enter “Team Name” into the header cell.
- Fill in the following columns: Team Name, DivCode, First Name, Last Name, PDGA
- IMPORTANT: Team Names are case-sensitive and must be entered in exactly the same for each doubles or team competitor. If the team names are not exact matches, results will not be displayed correctly after an upload.
- Follow steps 5-11 in the Upload Player Data – Basic section above.
When the upload is complete, your event page will display teammates grouped together on your event’s results page. See screenshot below.

Click to view the full-size image.
After the Team/Doubles event begins, please refer to the "Uploading Scores for Team/Doubles Events" section for information on how to properly upload team/doubles scores and player data.
Set Up Courses & Layouts
Now that player data has been uploaded, course layouts can be set. A course layout is a unique configuration of a course.
- In Tournament Manager, click "Layouts" in the menu at the top of the page.
- In Course Layouts, click "Add Course Layout".
- Use the dropdown to select the local course being used for the event. You can also select Temporary Course if you're playing on a course that's not listed in the course directory.
- If this course has been used for a previous tournament, you can select a previously entered layout from the dropdown menu. This will import all the layout information from that layout, including hole numbers, par, distance, tee, target, and hole notes. If you choose an existing layout, be sure to read the hole notes to make sure they match the rules you wish to use for your event. If you create a new layout, continue following the steps below:
- Add a Name for the Course Layout in the "description" field. This can be as simple or as complicated as you need it to be. (e.g. Brookside Park, Fall Creek DGC Golds, Washington Park Long Tees Short Baskets) This is the name that will appear on the results page on the PDGA website when you publish starting assignments. If you are using multiple courses for your event, it is recommended you use a name that will let your players know which course and layout they are playing (e.g., Central Shorts, Northside Blues, Riverview Main, etc)
- Set the number of holes, and par and distance for each hole. If you are not doing live scoring for your event, make you can enter the total par and total distance. You can also click on the hole number to change its label (e.g. if your course has "hole 3" and "hole 3B", etc.). Click the Update button when finished, or click on “Add another layout” to continuing adding course layouts.
- After all layouts have been added with the correct info, click the Layout Assignments link and use the dropdown menus to select which layout will be played for each division during each round. Make sure to click the Update button for each round. Correct layout assignments are required to generate accurate round ratings.
You can access a summary of the course notes from the Export page of Tournament Manager. Each layout has options to Print Layout Notes and Print Layout Details. These two options open a new page with the course rules. The URLs for these pages are publicly accessible, so you can email the links to your players or post them on your website. These pages will automatically update if you change the layout details in Tournament Manager. It is best practice for TDs to fill out their layout details in Tournament Manager as early as possible and share the links so the players will be able to know the specifics of their layouts before the tournament begins.

Groups (Tee Times / Holes)
Tournament Manager is home to a feature called "Groups" that can be accessed via the main menu. The Groups page gives Tournament Directors a quick and easy way to group players into cards and assign each card a tee time. This feature serves as a smoother, far less tedious way of adding tee times compared to the "old way" in which TDs have to manually add tee times to the Upload spreadsheet. For a practical example of Groups, check out a case-study from the 2019 IDGC Amateur Championships.
*NOTE: Tee Times can still be assigned via the Upload spreadsheet, but we strongly encourage using the Groups feature.
- Once all the player names have been added to the event, click on Groups in the menu at the top of the page.
- Use the dropdown menu to select which round to assign tee times to. Click the Select button.
- On the page that loads, make sure the Layout assigned is correct for the respective round. If it is not, proceed to the Layouts page to make the correction, and then return to the Groups page. All players from the divisions assigned to the layout for that respective round (listed above the Round dropdown menu on the page) will be assigned tee times.
Groups - Tee Times
- Click on the First Tee Time field and use the dropdown menu to select the time of day that the very first group of players should tee off. If the dropdown menu does not contain the time you need, manually type the time in (be sure to use military time for 1:00pm or later, e.g. 13:00).
- Choose your Group Interval (amount of time between each tee time).
- Choose your Group Size (number of players to group into each tee time by default).
- The system will make adjustments when a number of players are leftover that differs from what you selected as the Group Size.
- Example: Group Size set to 4. MPO division contains 35 players. The system will create 8 foursomes (32) and one threesome (3) for a total of 35 players.
- Click the Assign Groups button. IMPORTANT: Group assignments will not be published to the results page until you've had a chance to review and make adjustments.
- Tee times will be assigned automatically. You can edit the groupings and/or tee times via several different methods:
- Move individual players from one group to another. Drag and drop the individual player name with the mouse.
- Move entire cards to a new position. Drag and drop the tee time above the group of players with the mouse.
- Manually adjust the tee time of one group by double-clicking on the tee time. Once adjusted, all the cards after it will be adjusted automatically.
- Add a blank group to the end of the tee times by clicking the Add Tee Time button at the bottom of the page.
- Drag players or groups to the Unassigned Players box to remove them from the tee times assignments.
- When tee times are assigned correctly, click the Publish Groups button at the bottom of the page to publish the tee times to your event page on PDGA.com.
- To remove the published tee times from your event page on PDGA.com, click the Delete Groups button.
- If tee times have been published for multiple layouts/rounds that need to be removed, use the Delete All Groups button.
Groups - Holes
The Holes feature works almost exactly the same as the Tee Times feature. Make sure to have your courses set up properly on the Setup page and make sure they are assigned to the right divisions for the right rounds on the layouts page. Choose the round and layout you wish to set Holes for and click the Assign Groups button. From there, the Holes feature operates the same way that the Tee Times feature does, with the only difference being that there is an Add Ghost Hole button instead of an Add Tee Time button.
Once you've published the Holes, a column will appear on your event page displaying the hole assignments you've set up.
Click to view the full-size image.